BELL SIPHON CALIBRATION INSTRUCTIONS
How to calibrate your bell siphon?
This guide will explain how to calibrate your bell siphon. There is the science behind it, but we will keep things as easy as possible. Bell siphons are quite simple as far as mechanics go in the sense that there are no moving parts besides water level rising and falling.
We designed our bell siphon to achieve a high dump rate from a slow water flow rate. We are proud to say all bell siphons are thoroughly tested and calibrated before leaving our site. Perfect! But some fans write to us the bell siphon does not work. How could this happen? After a while, we realized it’s because fans use the bell siphon in all kinds of different environments. 99% of the time, the water flow rates are assumed incorrectly.
If you want better bell siphon experience, you better learn to tweak the water flow rate. Note that calibration is an ongoing process that needs to be performed throughout the life of the growth kit. Without calibration, the bell siphon may not work as designed.
Problems Calibrating and Solutions
There are two main problems the bell siphon (the part that dumps the water from grow tank to reservoir tank) can have. The first is under-siphoning, where the water flow rate is too low, so the siphon never starts, and the second is over-siphoning, where the water flow rate is too high, so the siphon never stops.
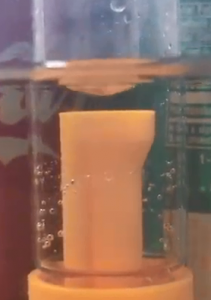
With a perfectly calibrated bell siphon, you should see a constant water level rising and falling. The water may start trickling down the tube, but water inflow should overtake the trickling loss. Then you should see rapid dumping of water to the reservoir signaling of successful siphoning. Once the water level is sufficiently lowered, the siphon should stop with a strong burp.
If you hear any other sound such as ‘trickling’ or ‘gurgling’, then you need calibration.
Siphon does not start – the trickling sound
Solution: Increase the flow rate
The relationship between the pump’s flow rate and the pumping height was a second-degree polynomial. In our calculation, minimum 40LPH (10GPH) was required for a successful siphon start. The siphon did not start if the pump inflow could not overtake the inevitable slow trickling down of water. We called this stage a “perma-trickle”.
The grow tank is filled with water so it seems to be ready to start siphoning, but it doesn’t because water is slowly leaking to the reservoir below. The water-in is less than water-out. The drain pipe sucks in the air instead of creating a vacuum to prime the pipe. You can prime the siphon in two ways. Increase the water pump rate or increase the pressure resistance in the drain pipe. The water pump has an adjustable valve. Rotate towards + to increase the flow rate. The water pump needs regular clean up to remove sludge build-up.
Siphon does not stop – gurgling sound
Solution: Decrease the flow rate
The grow tank is drained, but it is not refilling back up. Water-out is greater than water-in. You can break siphon in two ways. Decrease the water pump rate or decrease the pressure resistance in the drain pipe. The water pump has an adjustable valve. Rotate towards – to decrease the flow rate.
At an inflow rate above 300LPH (80GPH), siphon did not stop reliably at the end of the discharge. At this high rate, the water inflow rate exceeded the minimal speed which air could enter the bell to break the siphon. We called this stage a “perma-drain”.
Water pump is getting weaker
Solution: Clean or replace the pump
The water pump, over time, whether through age, contamination, algae build-up, etc, will slow down. This will result in decreased inflow rate. so siphon does not start properly.
Siphon water path is blocked
Solution: Clear away offending media or roots
Siphon’s water path is blocked by media or overgrown roots is another common issue. The blockage causes slow water outflow so over-siphon happens.